Photographing miniatures, dolls, dollhouses, roomboxes and dioramas
Pictures are an important medium, providing a way to share our treasures with other miniaturists all over the world. This page is for collecting photography tips. It also features famous photographers taking pictures of miniatures.
See also
- photographing - how to take pictures of your miniatures, tips and pictures of famous photographers taking pictures of miniatures
- photos from miniature exhibitions.
- cameras - for projects showing photography and photographers in miniature. Is your mini person a photographer?
- photos - Where do you store photos of your projects? Do you have an album on the Web? This page lists some of the services available.
Also see scrapbooking, and craft rooms
Blogs
Shooting Miniatures - a Day in the Life of - Caroline McFarlane-Watts
 |
|
Pic
|
 |
| |
|
| |
| |
Tips
Build a Simple Photo Booth - for under $20, from Italian Horses
Build your own Lightbox - from Lynda.com
Cardboard Lightbox - from
DIY $10 MacroPhoto Box
Home Made Light Box - by Nora Jean
Light Box - by Stephanie Brown
Make a Set Backdrop - from About.com
Mini Photography - from Greenleaf Forum
Photographing Mini Shows - from About.com
Photo-box - CDHM Tutorial
Photobox - Anna Carin's Tutorial
Photo Tips - by Elizabeth McInnes, Facebook
Photography - read photography articles, browse photography equipment and digital camera reviews
Photographing your Clay Creations - from New Clay News
Photography Hints
Photographing Miniatures - from Dollhouse Miniature Resource
Photographing Miniatures - from Tiny Tin Men
Photographing your Clay Creations - from the New Clay News
Photography 101 - from Tinycrafts, links to useful tutorials
Photoexpress - a watered down version of Adobe Photoshop software and it allows the user to make basic editing to their photographs online before sharing them.
Photoshooting and Making Videos - from Marion Swift blog
Picresize - crop and resize your images
Staging Models for Photography - from Swannys Models
Take Good Pictures - from the Creative Doll
Watermark - identify your work, prevent copying
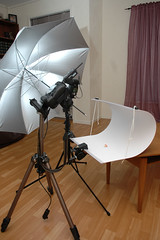
Hints
- Jody sets her scenes up in a light box her husband made with an opening in the top and sides. She covered the openings with two layers of sheer interfacing and placed an Ott lamp to one side. She put the light box in a window so that natural light shines in from above and takes the photos with her digital camera with and without flash settings and single lens reflex flash. She further edits the photos in Picnik to adjust the temperature, contrast, etc.
- 1. Look your subject right in the eye through your lens.
2. Use a plain background if the subject is wearing wild prints.
3. Use your flash outdoors. It fills in shadows nicely.
4. Move in close. Fill your viewer with your subject.
5. Move your focus away from the absolute middle of your photos.
6. Lock your Focus
7. Know your Flash Range - too far and your subject will be too dark, too close and too much light.
8. Watch the natural light. The best time to take nature pictures is early in the morning, and later in the afternoon.
9. Take some vertical pictures. don't be afraid to do this. You can get some great compositions!
10. Be a picture director! If you have 5 people for a picture or five dolls...... Have some lower than others and keep their faces close together. Pose your groups! Not just have them stand in a row.
- Be creative! Be daring! Digital cameras don't have film to develop! Just delete the ones you don't like! Learn how to preview your pictures in your camera and learn how to delete the bad ones.
- Often taking a closeup picture of a project will reveal mistakes in the project which can be corrected!
- The macro setting is not always necessary. Instead of getting closer to what you want to photograph, move back. Use the auto focus feature.This gives you a greater depth of field (ie the whole room will be in focus instead of just the front or just the back). Then use a graphics program to crop the photo, even cropping to just the item you want to feature out of a whole room. Don't use zoom and the macro setting at the same time.
- When you are using the Macro mode be sure to not use the zoom. Put your zoom at the widest setting and leave it there while using Macro.
- The closer you shoot, the more you need to hold the camera absolutely still. When you press the button, sometimes the shake is enough to blur the image. A tripod is a must, and a cheap one is just fine. Another other trick is to use the delay - Press the button then get your hands totally off the camera before it snaps - no possible blur because of camera shake. There are table top models that don’t cost much or floor types that cost a little more. Tripods are designed to attach to the camera, so check to see if yours has a screw to do that. If you choose not to use the tripod, take the shot at a distance and then crop it in the photo program. It depends on what resolution you want and what your camera is able to take.
- Check your camera specifications to find out the closest distance it is able to focus. This can vary quite a bit between different cameras, and if the camera isn't built to take photos at say 2 inches, nothing will make it do so. If you can't readily find this information, do an online search for the camera model, perhaps on dpreview.com , and check the specifications given.
If your camera can't focus up close, you can try taking a photo at the closest it can focus, and then crop and/or zoom in on the subject. That may well produce a useable image for you, as often we don't actually need or use the full resolution of a camera.
Your camera may also be having difficulty focusing if you are trying to get it to focus on an area with few edges or contrast for it to work with (say the bottom of a china dish....). Try having it focus on the edge of your object, holding down the shutter release half way to lock the settings, and then swinging the camera round to compose the shot as you actually want it
Photographers
Dongedy Frame - featured in Creativadoration
Hits since 10 July 2009: 
Share


Comments (0)
You don't have permission to comment on this page.