December 2, 2012
Anne's Present to You, How to make a Pram
Tutorial “Mini-Mini-pram” from “tea-light-candles”
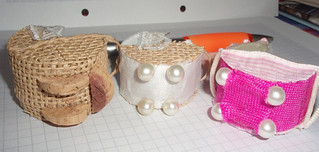
Reusing/recycling
Take 2 pieces, cut out a ¼ of each.

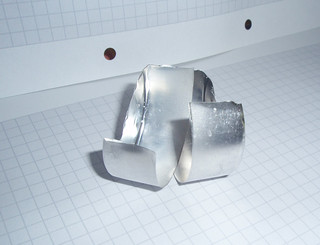
Use glue or tape to stick them together
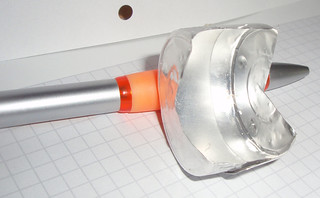
Cut 2 long stripes of lining-fabric or paper to cover the inside and outside “circle” (measure as wide the inside and as long as the circle of your “pram” is! )
Glue into place.
Cut 4 circles- pieces of cloth or paper (whatever you like) to cover the inside and outside sides. Cut out ¼ again of each fabric/paper-circle (to have the “opening” !)
Glue into place.
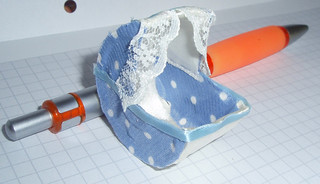
You might like to cut the pieces a little bit wider than the “pram” actually is, in order to perhaps cut off some trimming when all is dry, or cover up a point or two!
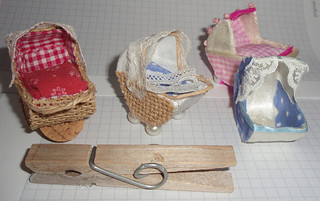
Choose the material for the “handle” and glue inside the pram.
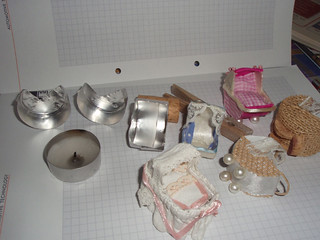
Glue some soft material into the bottom of the pram and cover with a tiny piece of cloth, or sew a tiny cushion to serve as “mattress”.
Make a tiny pillow, a tiny blanket to put inside.
Decorate the upper opening with some tiny piece of lace, or other material.
Decorate the outside parts with ribbon, threads, tiny beads etc.
Choose 4 small beads to serve as “wheels”, glue into place under the bottom of the “pram”.
Hope you will have fun making these!
In order to get a more even result, I sometimes glue the fabric or paper onto a sheet of paper first and then cut the pieces to cover the inside and outside.
Best wishes to all and a very “Merry Christmas”!
Anne from mikropragmatakia.blogspot.com
Go back to the advent_calendar_2012.
Hits: 
Share

Real estate agent advertising
Real estate agent website templates
Printing Company
Real estate agent advertising
Realtors website

Comments (15)
Irene Sjostrom said
at 5:53 am on Dec 2, 2012
Your little pram is adorable and I sure plan on making one like you have shown us to put my tiny 1" porcelain babies I make. Please check out my website Hugs and Merry Christmas ...............www.drresdollclinic.com
Carol said
at 10:20 am on Dec 2, 2012
Aren't those cute!! Great idea & it looks like you could make up a few quite quickly.
johanna janhonen said
at 10:25 am on Dec 2, 2012
Thank you Anne, very clever indeed :).
Brenda Faubert said
at 10:31 am on Dec 2, 2012
Fantastic!
Pat Wareing said
at 11:57 am on Dec 2, 2012
Very clever use of something that would usually be thrown out.
Lisa T said
at 2:29 pm on Dec 2, 2012
What an adorable idea. Thanks for sharing!
Marianne Asselman said
at 2:32 pm on Dec 2, 2012
It's such a good idea and thank you so much for sharing
Dolores Gadway said
at 6:13 pm on Dec 2, 2012
Great idea. I marvel at those of you who have the" mini" eye.
Pat said
at 8:51 pm on Dec 2, 2012
I love this. I always wanted to know what to use these for! Woo hoo!
A.Dourou said
at 10:03 pm on Dec 2, 2012
Hi all! Great, so many comments...just lovely! This was a total surprise!!! :) Thank you so much!!! I will wait till midnight in Greece...and tomorrow post the WINNER!!!! Anne
Jaz Ash said
at 10:57 pm on Dec 2, 2012
Very clever Anne...I will make one for Baby Pink! xxx
Skipper said
at 7:58 am on Dec 3, 2012
Excellent tutorial with good pics. Thanks for sharing.
A.Dourou said
at 3:53 pm on Dec 3, 2012
Hi girls!! I was in our shop and asked a customer to say a number between 1 and 11 ( not counting my own comment!!!) So..here we are: Comment No 6!!!!Lisa Topping !! Congratulations! I will contact you! Thanks again for all nice comments and your participation!
A.Dourou said
at 7:36 pm on Dec 16, 2012
Just to let you know...haven't had any answer from Lisa to my email..if there is none until Dec 25th..another one of you will be the lucky one!
Leilani said
at 10:56 pm on Dec 21, 2012
Anne, thank you so much for sharing this tut. I use votives candles all the time and save the cases so I'm going to make
a couple of these pretty prams too .
You don't have permission to comment on this page.