December 3, 2013
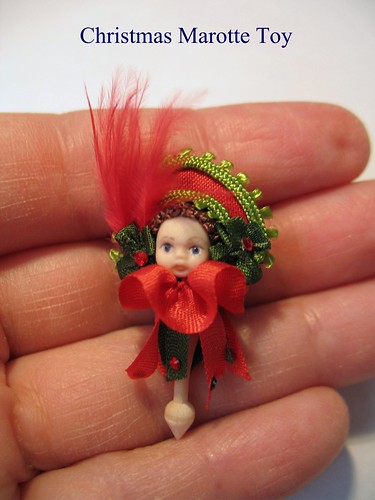
Marotte Toy
Special Christmas Edition by miniature artisan Sandra Morris
Marottes (or poupards) were small carved wooden dolls that were made throughout Europe from the late 17th century. Simple versions were carved in one piece and usually represented a baby in swaddling clothes. Later dolls had separately made limbs attached to a turned body and head, and were often found in family, farm, village or Noah’s ark family groups. Poupards with a musical movement triggered when the doll was twirled were called marottes.
You will need:
- Small porcelain doll head (alternatively you can make one from polymer clay, or paint a face onto a small wooden bead. It is best if the head has a short neck and it will also need a hole in the neck. Ideally the head should be approximately 3-4 mm diameter, roughly the size of a 1/24th scale baby. Remember that the finished marotte is intended to be held by a 1/12th scale child!
- Wooden handle (approx 1” long) – you can use a section of turned stair spindle, wooden turning, or cocktail stick
- 4mm wide red and green silk ribbon
- 7mm wide red silk ribbon
- Scrap of red silk fabric
- Red or green picot braid
- Red feather
- Red and green pinhead crystals.
- Bunka braid in the hair colour of your choice.
Instructions
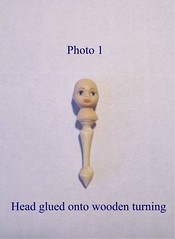
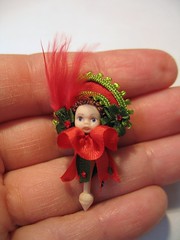
1. Glue the end of the wooden handle into the neck of the head. You may need to ‘sharpen’ the end so that it fist neatly into the neck opening. Set aside till glue is completely dry.
2. Unravel a length of hair-coloured bunka so that if forms a curly ‘frizz’. Apply a thin layer of glue over the head where you want the hair to stick. The easiest way to apply the hair is to start at the nape of the neck and follow a spiral pattern, around the head, finishing at the top of the crown.

3. Cut 4 lengths of 4mm wide silk ribbon in both red and green. These should be just long enough to fit from under the head to ¾ of the way down the handle. Cut one end at an angle.
4. Glue a tiny pinhead crystal onto the angled end of the silk ribbon, green on red, red on green.
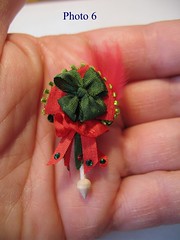
5. Glue these ribbon streamers around the neck of the head in two rows, alternating the colours.
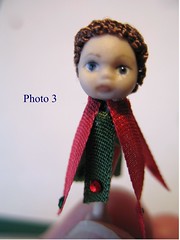
6. Cut a 3” length of 7mm wide red silk ribbon. Gather tightly and glue around the neck, over the top raw edges of the ribbon streamers so that it forms a ruff.
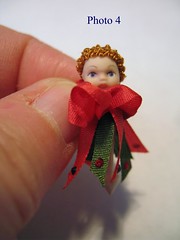
7. Now make a simple hat using two small pieces of red silk. This can be any shape you like so long as it has a front and a back. My marotte has a ‘crescent moon’ shaped hat, but you can experiment with different styles and shapes. Glue the front and back of the hat together around the outside edges, leaving the bottom open so that it will fit onto the head. Glue picot braid or other similar small scale trimming around the raw edges of the hat.
8. Glue the hat onto the head and allow to dry before proceeding.
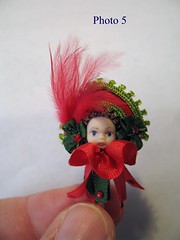
9. Decorate the hat with silk ribbon rosette bows, feathers etc. Finish off the hat at the back with a larger silk ribbon rosette bow.
Finished marotte toy
Sandra Morris
Feeling creative now? See also polymer_clay , diy_character_dolls .
Go back to the advent_calendar_2013 .
Hits: 
Share


Comments (7)
Sandra Morris said
at 3:32 pm on Nov 20, 2013
Sandra Morris
johanna janhonen said
at 12:31 pm on Dec 3, 2013
Thank you Sandra, very nice DIY, and different too, never knowabout this toy before :)
Sandra Morris said
at 2:25 pm on Dec 3, 2013
Thans Johanna.... I'm pleased you like my little tutorial. It's a lovely easy make for a cold winter's evening by the fire :)
Simply vary the colours and hat shapes and you could fill an entire miniature marotte shop!
Lisa T said
at 2:43 pm on Dec 3, 2013
Love the tutorial, Sandra! I have not made one before, but would love to try it. So adorable..thanks for sharing!
-Lisa
Sandra Morris said
at 4:07 pm on Dec 3, 2013
Thanks Lisa.... I hope you enjoy making a little Christmas marotte!
chris v said
at 7:53 pm on Dec 4, 2013
how very cute! thank you!
Sandra Morris said
at 8:00 pm on Dec 4, 2013
Thanks for reading Chris :)
You don't have permission to comment on this page.